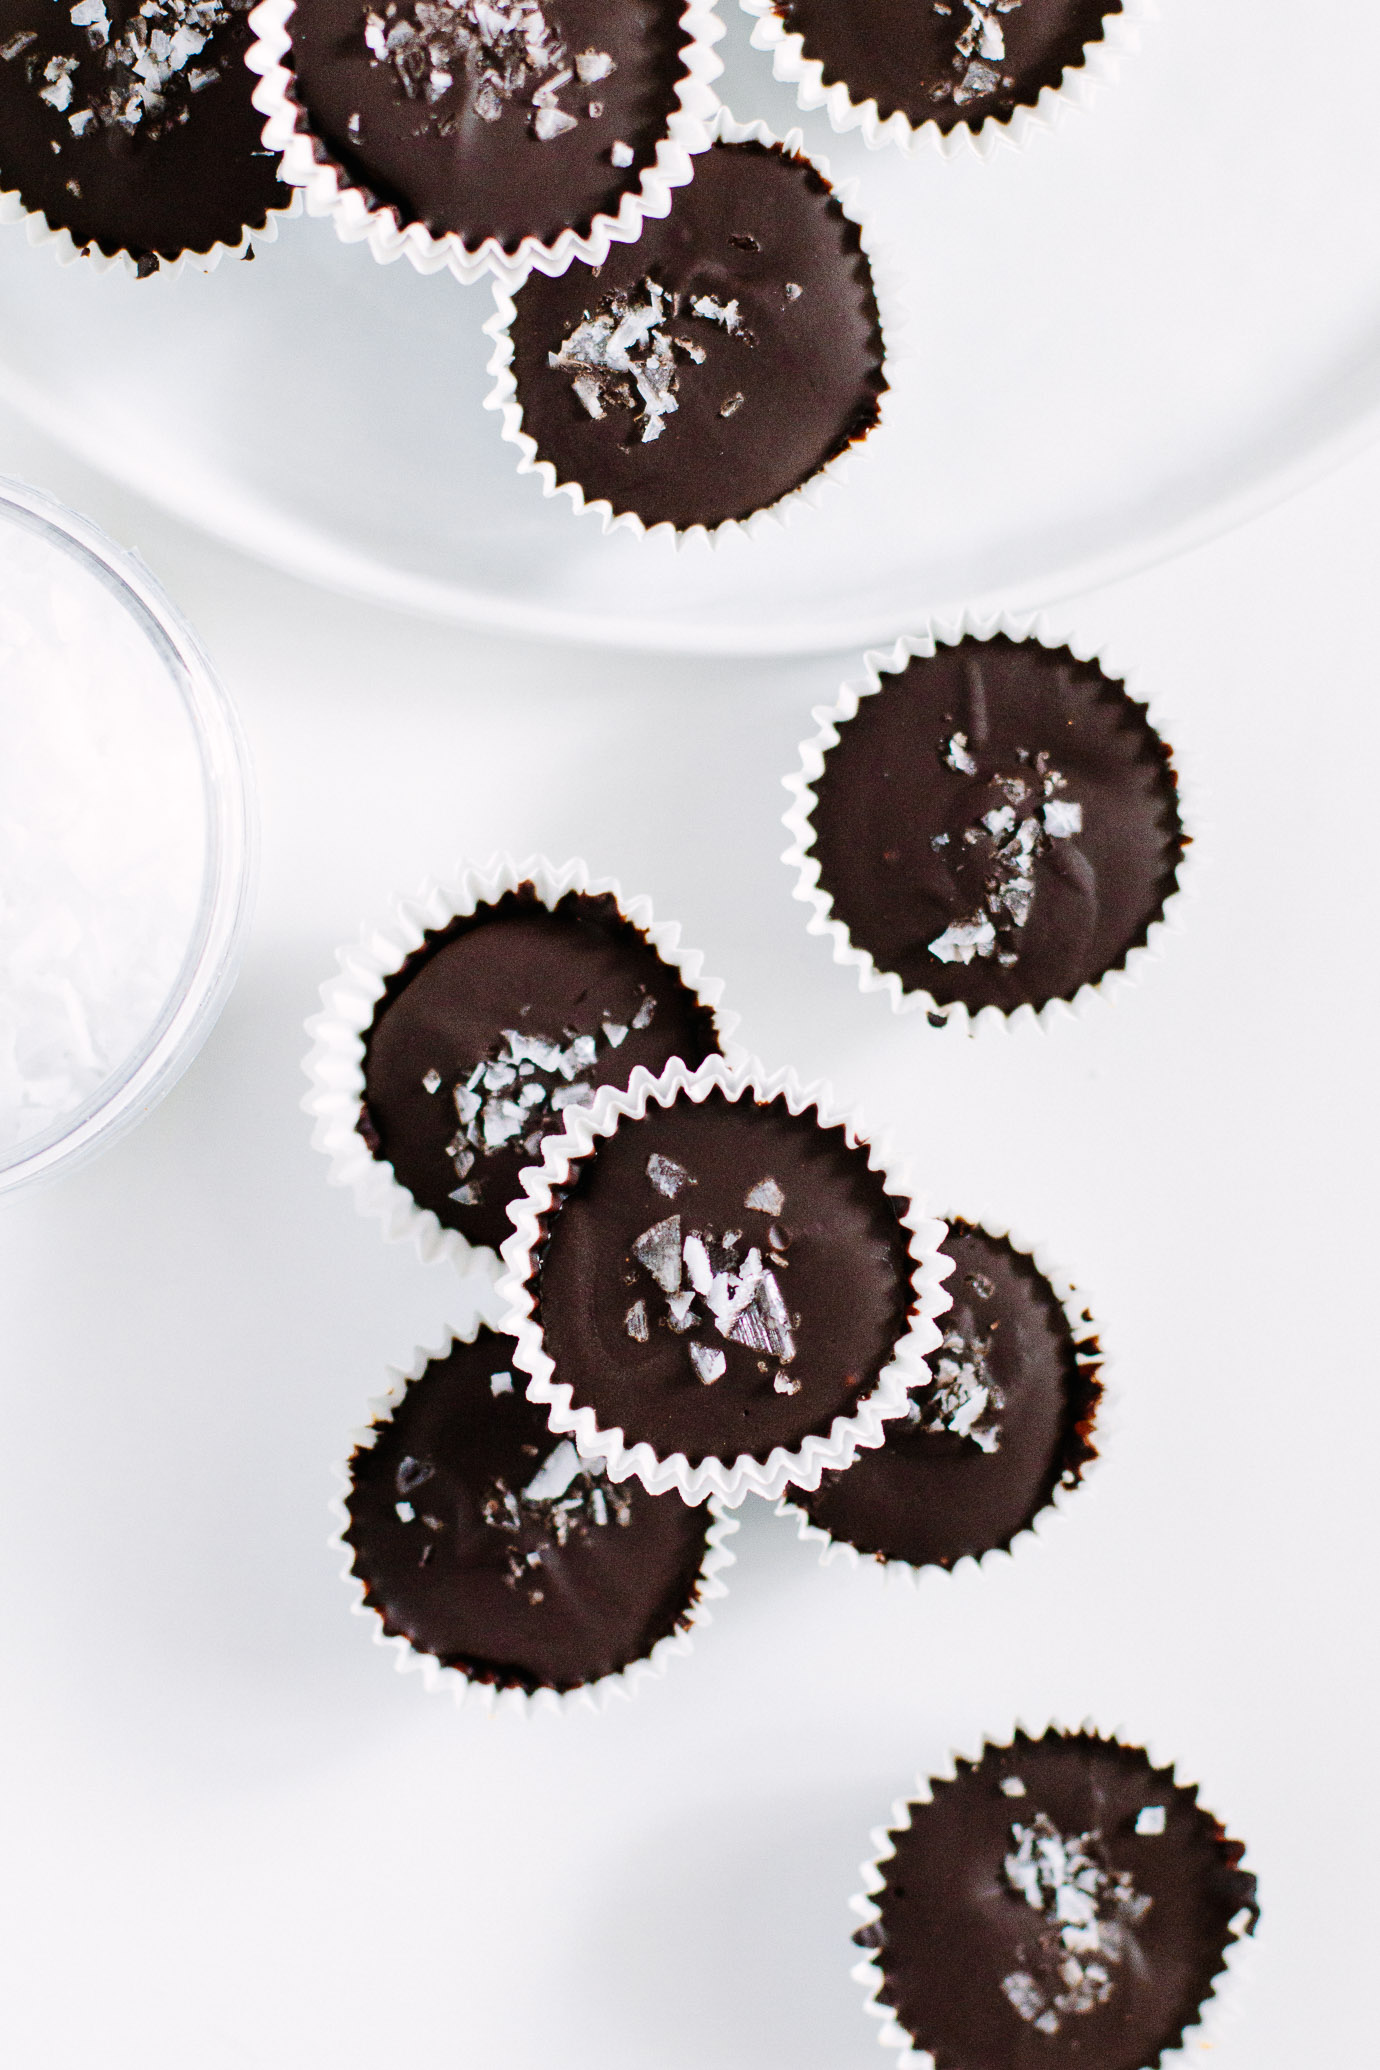
I used to consider myself not a chocolate person. You might think I’m crazy, but I’ll still opt for a fruit sweetened dessert over a chocolate lava cake or brownie. That being said, put one of these dark chocolate peanut butter cups out and I’ll choose it every time.
dark chocolate peanut butter cups
These homemade dark chocolate peanut butter cups have the perfect peanut butter to chocolate ratio. They’re lightly sweetened, rich in minerals from the dark chocolate and stuffed full of peanut butter. For this recipe, I opted for making my own homemade chocolate with three simple ingredients – cacao butter, cacao powder and coconut nectar. The recipe is inspired by Jessy Snyder and My New Roots. While this process takes slightly longer than just melting a quality chocolate bar over the stove or in the microwave, it felt incredibly rewarding knowing that these little treats were made 100% from scratch.
That being said, if you want to speed up the process you can definitely use your favorite high-quality chocolate bar. I like these brands – Hu Kitchen, Eating Evolved, Honey Mamas, and Pure 7.
This recipe takes about 30 minutes from start to finish, including a little bit of chill time to set the chocolate base. 30 minutes really isn’t that time consuming. If you have a little free time, want to get your loved ones in the kitchen, or make a homemade gift for the holidays, definitely give these dark chocolate peanut butter cups a go!


 Nourished by NUTRITION FACTS:
 Nourished by NUTRITION FACTS:
Cacao powder – this ingredient really needs an entire post all to itself (!!) but in short, cacao is the brown powder that gives chocolate it’s bitter taste. It gets touted as a superfood, but for good reason.
-
- Antioxidants – most notably flavonoids and polyphenols. These compounds help fight your free radicals that contribute to inflammation, aging, and other diseases like heart disease, cancer, and Alzheimer’s.
- Minerals – high in magnesium, iron, zinc, potassium, phosphorus and copper.
When choosing cacao powder or chocolate, look for raw cacao or the darkest chocolate possible (70% cacao or higher). This ensures the cacao or chocolate has been through less processing and retains the most antioxidants, nutrients and therefore health benefits.


IF YOU LOVE THESE Dark Chocolate Peanut Butter Cups, YOU’LL ALSO ENJOY THESE RECIPES:
 IF YOU LOVE THESE Dark Chocolate Peanut Butter Cups, YOU’LL ALSO ENJOY THESE RECIPES:
-
- Cacao Tahini Collagen Bites
- Almond Butter Brownies
- Frozen Chia Seed Peanut Butter Cups – Dolly and Oatmeal
- Superfood Nut Butter Cups – My New Roots
- Chocolatey Tahini Cups – Food 52
Dark Chocolate Peanut Butter Cups
Homemade dark chocolate peanut butter cups lightly sweetened with coconut nectar or maple syrup. This recipe calls for making your own chocolate, but you can melt down a high-quality chocolate bar instead. I like these brands – Hu Kitchen, Eating Evolved, Honey Mamas, and Pure 7.
Makes 12
Ingredients
homemade Dark Chocolate:
- 1/2 cup (60g) cacao butter, finely chopped
- 1/2 cup (40g) cacao powder
- 3–4 tablespoons coconut nectar or liquid sweetener of choice
- 1/2 teaspoon vanilla extract
Peanut Butter Filling:
- 1/3 cup (80g) peanut butter
- 2 tablespoons + 2 teaspoons (18g) coconut flour
- 1 teaspoon coconut nectar or other liquid sweetener
Instructions
Homemade Dark Chocolate:
To create a “double boiler”, add about 2 inches of water to a large saucepan and bring to a boil over medium high heat. Turn the heat down to a simmer and place a medium glass or ceramic mixing bowl on top.
To the mixing bowl, add the chopped cocoa butter. Stir until the butter is melted (about 2-3 minutes) then remove from the heat. Remove bowl and set on a flat surface. Add the cacao powder, vanilla and coconut nectar (or other sweetener) and whisk until smooth.
Peanut Butter Filling:
Make while the chocolate lined cups chill. Combine the peanut butter, 2 tablespoons coconut flour and coconut nectar in a small bowl. Mix until combined. Add 1 teaspoon of coconut flour at a time until the peanut butter begins to form a “dough ball”. The mixture can be somewhat soft but still hold shape when you roll it into a ball in your palms.
Assembling the Peanut Butter Cups:
Arrange 12 mini candy or cupcake liner inside a mini muffin tin or side by side on a small baking pan.
Using a mini spatula or spoon, carefully place about 1-2 teaspoons of chocolate into the 12 liners. Pick up each liner and carefully tilt the liners so the chocolate coats the sides. Likewise, you can use the spatula or spoon to move some of the chocolate onto the sides of the liner. Transfer chocolate to the freezer or refrigerator to set for about 10 minutes.
Remove the chocolate cups from the freezer or fridge. Take about 1 1/2 teaspoons of the mixture and roll it between your palms to form a small ball. Place the peanut butter ball in the cup and flatten slightly with your finger. Repeat until all the liners are filled.
Using a spoon or spatula, place about 1-2 teaspoons of chocolate in the liner to cover the peanut butter filling and give you a flat top. Once all the liners are filled, gently tap the pan on the counter to even out the chocolate later. Sprinkle with flaky sea salt (optional).
Place the pan in the fridge or freezer for another 10 minutes until set. Store in an airtight container in the refrigerator for 1 week, or in the freezer up to 1 month.
Notes
This recipe includes making your own chocolate, which may take a little forethought because cacao butter isn’t widely accessible (except my local Whole Foods did just start carrying the Navita’s brand!). Cacao butter allows the chocolate to be stable at room temperature, unlike coconut butter or coconut oil. However, you can definitely just melt down a high-quality chocolate bar. I like these brands – Hu Kitchen, Eating Evolved, Honey Mamas, and Pure 7.
You can substitute any nut butter for the peanut butter. Since some nut butters are more drippy than others, you may need to adjust the coconut flour accordingly. If you are using unsalted nut butter, I recommend adding a pinch or two of salt to the filling.
DID YOU MAKE THIS RECIPE?
I’d love to hear how it turned out for you! Leave a comment below and share a picture on Instagram with the hashtag #nourishedbynutriton.
This recipe looks yummy. I have just found out your blog which I find awesome.
You’re so kind, Silvie! I truly appreciate you leaving that little message for me and making my day!
It has never occurred to me before that I could make my own chocolate! What an exciting road you are taking me down. These look beautiful. Your images jump right off the page. I found your website through the comment you left on the Foodtography tribe facebook page. Looking forward to learning together!
You are the sweetest!! I still can’t believe how easy (and tasty) it is! Plus, it feels so rewarding knowing that it’s homemade. I appreciate you taking the time to stop by! The Foodtography Tribe is incredible and such a great resource! I’m so happy we’ve connected!